Wednesday, April 20, 2011

Rocket Surgery

Now that I've written about what I've done so far, I can do a bit more depth.  But, since I work full time and go to school, I don't have a lot of time for playing with the bike, even after cutting waaaay back on WoW.  So I did the easiest job I have, which is changing the headlight trim ring to the "frenched" style.

1st things first, if you look at this job and think you want to do it, make sure you get the right trim ring.  Their all about the same price, this was $15 I think, but sportster customs all have a different headlight bucket, so it takes a different trim ring.  You'll know its the custom one by the little tab at the bottom with the hole for the mounting screw.  You can see it in this awesomely-not-in-focus picture:

You can see the stock ring next to it.  Its quite a bit more shallow, I was a little surprised.  But the chrome is good quality, all in all it seems fine.  I see these things for a lot more than $20 at some places.  Also in this pic, you see the thick foamy seal thing.  I figured it had a purpose, more on that later.

As for the procedure, why do I title this post rocket surgery?  Because wow, this is so complicated.

Step 1: Take the screw off, it sits in the little tab, holds the trim ring to the bucket.  It won't exactly fall off once you unscrew it, but be careful.

Step 2: Removing the trim ring.  Since it only has one screw at the bottom, of course it holds to the top somehow.  At 10 & 2 oclock when you're looking at it, there are little notchy things on the headlight bucket that hold the ring on at the top.  It comes off pretty easily, JUST MAKE SURE YOU ARE READY TO DEAL WITH THE ACTUAL LIGHT ASSEMBLY!  Because it WILL just fall out.  Its held in by the wires attached to the headlight, and I doubt it would come undone completely unless it wasn't put together right, but it will fall and take a good swing at your forks or fender, and maybe crack the glass.

Step 3: Step four, get your new ring ready, put the screw on your screwdriver, because this takes 2 hands.  The third step is simply putting the new trim ring in place.  Like step 2, you have to deal with the headlight unit carefully.  In this picture, you see the little ring that basically mounts the assembly to the bucket, and then the trim ring holds that mounting ring against the bucket once its installed.  Here's the ring on the assembly:

This ring fits on the headlight one way.  Theres a little notch in the ring down at about 4 oclock looking at the headlight head on.  Make sure its in the right place.  I can see marks of the PO trying to do it wrong...

Then it fits on the bucket with little notches right around the mounting ears.  Its hard to describe, but again, it only fits one way.  Here it is mounted:

Someone tell me why this blog randomly rotates my pictures...  So this shows how the mounting ring aligns on the headlight bucket, and it also shows the little ears that hold the trim ring on at the top.

So you hold the headlight in place, and stick the trim ring on.  This is where the rocket surgery comes into play.  There is very little clearence to get this on, which at least tells me its made right.  The first impediment is the foam seal on the trim ring.  The stock ring fits right up against the light, so this new style naturally needs a way to keep pressure on the light.  But it makes it really obnoxious to put on.  Resistance.  So get it place straight on, and make sure the foam part is all the way around the outer edge.  then push it on and get it over the ears on the top.  Then the little glass bump thing at the bottom of the light gets in the way as you try to finish.  So after a few moments of fidgeting, I got the ring on, and then screwed it in place.

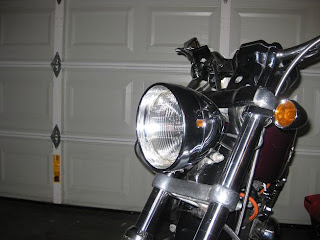
The result is relatively dramatic, and I like it.  Eventually, I'll be painting the bucket black, and leaving the ring chrome, so it'll be a neat 2 tone thing, but now I may end up painting the ring black too.  I dunno.  So here it is:

 BTW, I was wiping off the fingerprints & stuff, and noticed a huge nasty scuff on the left side of the bucket...  How on earth did the PO manage that...

Saturday, April 16, 2011

Painting & Color Plans

Aside from that, I'm planning to paint some stuff.  I've never painted anything really, but I've been studying online, and like the brits say on Top Gear, how hard can it be?  There are 4 seperate instances of painting, each with their own challenges.
1)  Side Covers.  As I've said, I'm painting the primary cover wrinkle black.  I'm actually leaving the clutch cover and the inspection hole cover chrome.  I'm trying to balance the chrome and black on the bike, since I don't want it all black, and there are things I don't want to bother with painting black, like the complicated 3 piece head covers.  The issue here is painting over chrome.  It has to have the bejeebies sanded out of it, then self etch primered, regular primered, then I need to find some actual wrinkle black paint, which I know Rustoleum makes, but Home Depot doesn't carry.  The other side of this part of the project, is painting the other side.  You can't just take off the cam cover like the primary cover, because it holds the cams.  At least part of it will be under pressure, so pulling the cover off would mean they would fall apart to some degree.  So my brilliant plan is to pull all but a few of the bottom bolts off so it doesn't fall off accidentally), tape off at the gasket, tape off the ignition cover, and then tape/newspaper off everything else.  Like surgeons do.  Then just do it on the bike.  Like I said, brilliant plan.  We'll see how it works.  How hard can it be?

2) Various parts will be painted just plain gloss black with gloss clear.  This will match the frame.  Almost all of these involve painting over chrome, which may be difficult.  These parts will be:
   - the new mirrors, hoping I don't screw it up...  I may leave them chrome as part of the balance thing, as the grips already have chrome pieces.
   - the horn cover.  Was going to do this wrinkle black, but meh
   - the back of the headlight bucket will be black, and the little frenched headlight trim ring I bough will stay chrome, which I think will be lovely.
   - the fork sliders. These are the bottom parts of the fork
   - possibly the triple trees, depending on how difficult it looks
   - definitely the upper triple tree cover piece and the big chrome piece that sits on the front of the handlebar riser.  Will do the back piece as well.  Thinking about doing the risers, riser cover, and speedo housing as well, but this may put it out of balance, and it may be a lot more difficult.
   - the rear springs and the top parts of the Shock mounts.  Backroads supposedly replaced the shocks, and I don't know if I trust it, because I can already tell they used these little covers over the top part that don't belong on this year bike, so it actually looks crooked. Will go into that more when I try to take them off.

I;ve already bought the paint supplies for this part, and plan to do it soon.

3)  The wheels.  I saw a youtube video, and at least one other place where the rims of the wheel were painted copper metallic, and it looks pretty cool, so I plan to do this.  So I found a guy selling a set of stock 16" rear & 19" front laced wheels & bought em, $140, pretty good deal.  They're not in the greatest shape, but I'm getting used to the idea of cleaning & sanding.  But I'll do the rim & hubs copper, the spokes will be black, and the nipples (actual techincal term, where the spokes meet the rim), will stay chrome.

4)  The tank & fenders.  I really like Harleys Denim paint they've been doing lately.  So I searched all over figuring exactly what this is.  Apparently, its just a mostly flat clear on top of regular looking paint, they just make it sound cool.  Commonly known as "hot rod black" or hot rod whatever.  I've seen some people just use flat black with no clear, but this doesn't keep well apparently.  So the plan is, rustoleum enamel gloss black.  Then I'll do a border of a classic kinda ivory off white around the side of the tank, which will be orange.  This scheme will go to the fenders as stripes.  Now, this will be a lot of work, since it will be 3 different colors, and I'll have to wait a day between doing each so parts can be taped off.  But basically, I will sand down through the pinstripes & gloss of the stock paint, no need for primer from everything I've read, since the stock paint should be good enough (except the rear fender, which will be bare metal if I ever get it), then lay down the white in the areas I need it, wait a day, tape up the white stripe and the orange areas, lay down the black, wait a day, tape up the black areas, then lay down the orange.

After that, I have to deal with the logo, because I'm not leaving it blank.  I think that's uncool when I see it, and it screams "cheap respray".  I can buy Harley decals, but its like $45 for the pair of the ones that I want.

I'm also looking at several websites that sell stencils without the cheesey breaks.  You'd lay it down like a decal, then paint, then pull the decal part off.  Its inexpensive, but I can't get a response on my idea from the few places I've asked for info.  So we'll see how that goes.  I can't use the stock emblems on my bike with the color scheme I've chosen, because my emblems are red, and it really wouldn't match.  It'll either be the black or ivory color.

Once the logo is dealt with, it'll all receive a 2 coats of Rustoleums matte clear.  I wish they made a satin clear, which is less mate, more on the gloss side, and its what harley does, but they don't.  If I had big money, I'd get all the paint through ColorRite, but its about 6 times more, literally.  But everywhere I read that you shouldn't mix brands.  And Rustoleum is inexpensive, and I see people say the best things about rattlecan jobs with Rustoleum.

Other little things I've bought & plan

So besides that, I have a few other things to do:

1) wrap the exhaust.  Instead of the normal fiberglass stuff, I got the actual titanium stuff from DEI, which is upposedly better.  I dunno, it won't be fiberglass, so I won't have to worry about the itchy scratchies.


2) Replace the air cleaner.  I'm using a round Mesh thing.  I haven't seen it on anything but the Rebel from Blue Collar Bobbers (they got me on the bobber idea in the 1st place, but sold out of their kits before I made up my mind, but check em out, best place to find kits for metric cruisers, http://www.bluecollarbobbers.com/ ), but its cheap, it looks cool, and it flows a lot of air.  Probably not great for rain though...  What they don't tell you, and I found out after I bought it, is that you have to get a seperate bracket that keeps the carb mounted, otherwise its just hanging out on the seal from the intake manifold.  That bracket was $25, which seems way too expensive, and that was the cheapest I found it, went up to $40.  And you still have to deal with the breather.  I already had that planned and got a trick unit from Kuryakyn that breathes through a spacer basically.  Heres the air cleaner and the breather thing:


3) Side Mounted Brake light & plate holder.  I got this from a few different places for pricing.  The mounting holder I got from one place on eBay.  They actually sell it with the light, but they charge double for the light from their source.  But they say where tey get those lights.  So I went & bought it from their source, and even got the LED kit for the Model A light, and saved like $20.  Good deal!  And yes it has the little clear light at the bottom to illuminate the license plate.  Generic plate frame, which isn't on in the pic, is $2 from Debrix.  Amazingly, in stock...  I read that the side mount brake light may be a problem in CA, but I really don't think it will be.


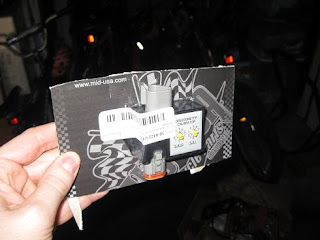
4)  Speedo Calibrator.  My sportster tells me it doesn't go over 65, and I'm pretty sure I've gone much faster.  It actually makes it really hard to deal with speed on the freeway.  I read online that a lot of people say Harleys do this.  So DeBrix sold this unit for way less than anyone else, and I'll give it a try.  I just have to be able to take my GPS on a ride to figure the % difference at various speeds.


I also bought an Oil Dipstick with a temp gauge, which is a pretty pop thing to do.  Its a good idea I suppose as well.  I just have to actual take the old one out, and make sure this new one is the right length.  The new one has no marks on the stick, which worries me a bit, so I may have to grind some on.

What makes it a bobber?

As my blog implies, I plan to make this a classic looking bobber.  Unfortunately, love the internet though I do, I've learned that its very difficult to find something original, and actually know its original.  So I don't really know what classic bobbers looked like, and I'm just going to go with what I like, which I think is kinda the spirit.  But there are several themes that are basically the same. 

1)  The rear fender is bobbed
I was originally planning to just cut mine, but there are a number of issues with doing this that I didn't want to deal with, such as the actual act of cutting, and filling holes.  And after pulling off the seat the 1st time, I saw this!
What we see in this blurry picture (looked clear in the camera's LCD...) is a giant dent and a bunch of nasty scratches.  As if one of the PO's took the seat off, dumped an assorted pile of knick-knacks inside, put the seat back on, and proceeded to further destroy this poor little sporty.  So I was then convinced I'd just get a new rear fender.  The bobbed one I had seen on Lick's Custom Cycles is like $300.  Nowai.  Then I found one on DeBrix for $80.  I bought it, but its now back-ordered, so who knows when I'll get it.

Its smooth, so I'll have to do holes for mounting, but I'm not using the stock rear light anyways, and it saves me the issue of filling holes I don't need.  So I plan to sell the original rear fender with the stock light as what it is.  Good looking, stock paint, use a 2up seat to hide the dent.  I just hope the new fender comes some day.  I emailed them as I wrote this.

2)  Handlebars
I see Ape Hangers, which I don't want to do because it involves changing the brake line, throttle cables, clutch cable, and electrical wiring.  And then drag bars, which I like.  So I bought a 32" black drag bar from J&P cycles, by Santee, only $30!  But its back-ordered too.  Two of the most important parts, and they're back ordered.  Dumb.  I've already bought vintage style grips and black levers for these.  And the after market mirrors on my bike are too small, so I bought stock looking chrome mirrors and plan to paint them black.  When I swap it out, I can sell the old bar, with the grips intact, and the crappy mirrors that are being replaced.  I emailed J&P about my bars as I wrote this.  I really like them, although they want you to do a membership club thing to save 5-10% on everything, like costco.  Here's the grips.


3) Spring Seat
The idea of a spring seat is that they're used on hard tails, so you don't pee blood.  So I see alot of people say they look dumb on newer sportsters unless you use struts.  But I plan to drive this, and I'd rather have a bit more suspension travel than tiny 2" springs.  Better for the bike too IMO.  So I got a mount kit and a La Rosa seat from Debrix.  I got the mount, but they still haven't shipped me the seat.  A lot of people complain about DeBrix online.  They have the best prices period, and best selection. But there customer service isn't always fabulous, they don't seem to have updated stock on the website, and their shipping is pretty nasty.  Not to mention they're in CA so I have to pay sales tax.  I've still bought from them because its cheaper though.  Again, I emailed them about it as I wrote this.  Its been 2 weeks since I ordered and it hasn't shipped.  Here's the seat I got, I like the brown, looks more leathery, and it'll go fabulously with the color scheme I plan to do.

Previous Owner Shenanigans and General Repair, Part 6

Part 6, general condition and stuff I still need to fix.

Carburetion
This bike has the stock "ham can" air cleaner, but one of the PO's took it upon themselves to do the popular exacto-knife-the-backing-plate-to-pieces, which allows a bit more air in.  You can't see it with the cover in place fortunately.  But it looks pretty proffessional when you take the cover & the filter off  ~_-    And look at that bright orange ignition wire snaking through there!

So, I already have a replacement setup, more on that in another post, when I actually put it on.  But aside from that, it runs rough until it is really, really warmed up, like 10 minutes, even with driving the 2nd 5.  Now, I know that it can take a while, but its kind of ridiculous.  Since this bike is now 13 years old, and the muffler & air cleaner aren't stock, I'm going to take it to a local shop to clean out the carb and rejet it if necessary.  I'm fairly mechanically inclined, having worked on every car I've owned, but messing with carburetors is absolutely no fun.

Mufflers:
Nate at Backroads wasn't sure, but he thinks the mufflers are Screamin Eagle.  Now, they have the HD logo script, but not the SE.  I don't even know what SE mufflers from the time look like, but I know new ones I've seen say Screamin Eagle.  But these do say they aren't for highway use, and they're definitely louder than stock, so thats a good sign right? (more on the effects of that in #2).  At first I thought they might be stock mufflers with the baffles removed, but I can see the baffle way down in there.  And the rear pipe is starting to blue, bummer!  Also, another oddball thing, is that for several years on sportsters, this year included, there was a cross over pipe right near the collectors by the heads.  I think it looks kinda dumb, and Harley changed it in 2004 I think, but my bike is myseteriously missing this bar.  Now, its not like they can just take it off, or there would be 2 big holes.  The pipes looks like they're just plain old pipes with no crossover, which is fine.  The problem is that the heat shield have the little notch/indent for the crossover.  So when I go to wrap these up, I'm worried its going to look stupid, and people are going to say "hey tard, your pipes are crushed right there" or something.


I plan to paint the tank & fenders.  As I was doing something, maybe I was checking how much fuel I had, I noticed the inside of the fuel tank may be a problem.
You can see the vent tube coming up in this pic, and its kinda difficult to tell, but whatever coating it had, is crackly-peeling off.  So when I take it off, I'll prbably do the 3M treatment that cleans it out and recoats it, although its kind of expensive for acid & paint...
The Oil Leak
Nate over at Backroads said they had spent some time fixing a nasty oil leak.  I stopped asking for details when I started getting into the bike.  Whatever they did, it didn't address this.  Harley's and most cruisers use a dry-sump oil system.  This means oil is stored in a tank instead of chillin at the bottom of the engine (under the seat for the most part), and its pretty rare in non-cruiser motorcycles, and really rare in cars.  This means there are all kinds of external oil lines and breather lines.  From the oil tank on the right side under the seat, a rubber oil line comes across to the left side, where it attaches to an L shaped plastic piece.  Then another line runs down to a 3 way junction.  Heres the parts diagram picture:
This picture kind of looks from the front.  It leaks somewhere around here.  The brilliant Harley design for draining the oil is here.  Instead of a drain plug like a car, a tube runs from that 3 way junction to a nipple thingy (technical term) on the frame, where it deadends, and has a screw clamp to keep it tight.  So oil basically fills this "drain tube" and then basically ignores it as it makes its way from the oil tank to the oil pump.  the 3 way junction is supposed to be the lowest point in the system, so that when you pull the drain tube, amazingly enough, it all drains.  Why the dumb fram dead-end?  Why not some kind of petcock? 

Anyways, so the drain tube dead ends at the frame and uses a screw-type hose clamp, like I said.  But the rest of the clamps are pinch-type hose clamps that are really only one-time-use things.  So as you can see in this very technical picture, that the oil is leaking around the 3 way junction plasticy piece, maybe up at the 1st junction and just running down:
In the pic, you can see how oil slowly wells up and hangs out on the bottom of one of those pinch clamps, and slowly does this:

That's sitting about a week.  Not cool.  Since I don't know where the leak is, and this is the lowest point in the system, I bought all 16 or so of the clampos from Harley, only $1 each, and plan to take the whole stupid thing apart and replace all the hose clamps properly.  I really hope it works because I'm going to use some expensive synthetic stuff that was on sale at cycle gear, and I'd rather not expensively lubricate my garage floor.  Hopefully, the oil lines are in good shape, or I'll have to replace some of those.  They look fine on the exterior from what I can see, other than being filthy, but they don't look cracked.  We'll see.

Other than those few items, I still plan to replace the shift shaft seal (and a little washer next to it), and the primary cover seal.  I'll be painting the primary cover wrinkle black after I pull it off.  More on that in the next post.

Previous Owner Shenanigans and General Repair, Part 5

Part 5, Front Brake

Another problem that was apparent right away, was a spectacular rattle that came from the front end.  Using my excellent reasoning and deduction skillz, I noticed that the rattling stopped when the front brake was pulled.  I got off and listened while it was idling in the garage and noted it came from the front caliper.  Here's a nice blurry picture, as my camera decided to focus on the bicycle wheel in the background.

So I look online about rattling front callipers, and I see people talking about a bunch of different crap, none of which is first hand accounts.  I look online and find 2 possibilities aside from major catastrophe that could be causing the rattle.
1)  There are 3 little viton rubber seals on the 2 mounting pins, but from the manual and parts diagrams, I couldn't figure out how they actually worked.  From the few issues I'd already seen, it did not seem entirely unlikely that these would be completely rotted away or not in place altogether.  $1 each, so I bought the 3 pieces from the local Harley place.
2)  There's a little clip that holds the outside brake pad in place.  I had seen this on the manual, and I understood the idea, but it just didn't dawn on me how important this piece was.  So I didn't buy one beforehand.

I decide to take the caliper off and see whats what, and replace the o-rings as I do.  This was entertaining.  The hex bolts are pretty big, but I had a T-Handle set that did the job.  There were 4 things that became immediately apparent.
1)  The viton seals are installed in little grooves in the mounting holes on the caliper to buffer the mounting pins.  I was correct that if they weren't there, the caliper would rattle, but the seals that were in place seemed fine.  But I replaced them anyways, since I had the new ones.  When I eventually put it back together, these did actually make a difference and the mounting felt more solid.  Yes, I greased them so it wasn't like they were dry...
2)  The little clip that holds the outside pad in place was non-existent.  "Well there's your problem."  But, I hadn't been that smart, and hadn't bought one.
3)  The inside brake pad was down to the metal.  This was pretty awesome since the outside brake pad looked fine.  The disc doesn't seem problematic, so I'd guess that either its a design flaw and the inside wears out faster than the outside, or one of the PO's replaced just the outside.  Highly unlikely, but who knows.  And no, I hadn't thought to buy pads yet either.
4)  The top pin has a little metal piece with a notch that mounts in a particular way over a little round nail-head looking thing on the outside pad mounting frame thingy.  I know, technical terms.  Whoever installed this last had mounted these pieces wrong, and they were smashed together and somewhat ruined.  The manual actually warns about doing this right.  The little nail head piece was ruined enough that I was worried I'd have to replace that whole pad holder frame, and they're like $40, so that wasn't happening.  So I gat to scraping at it with a flat head and eventually shaped it so it was functional.  And the little pin tube with the notch (called a Pin Boot on the diagram, and its actually 2 pieces, a tube and a little bellows type boot) actually has 3 notches, so I flattened out the flared part that was ruined so it would mount, and rotated it so it was mounted with one of the un-ruined notches.

Since I didn't have pads or the little clip, I just put it back together and went to the store the next chance I had.  Why do I put stuff back together in a case like this?  I have 3 little kids that think its cool to mess with stuff, and this is not one of those things I want them to mess with.

The pads were $34 at Cycle Gear, by EBC.  Organic pads.  I read online that there are 2 types of pads you should buy, and a 3rd you shouldn't.  Of the 2 good ones, there are organic and sintered.  Organic are softer, wear faster, and are cheaper.  Apparently, people like the feel of organic.  EBC, and other places I found, say that a good combo is organic in front and sintered in the rear.  Better feel in the front, but rear pads wear faster because more weight is on the back in Harleys.  You can find the cheap 3rd kind online for like $20, but these are the kind where the entire pad material part will come right off the backing plate.  Not cool.  Anyways, these good organic pads were $34, and Harley wanted $42 for theirs.  The choice is easy, and EBC pads are good quality from what I read.

The little clip, which is about the weight of a penny, costs a staggering $9 with tax.  Yay capitalism!

So I take the caliper apartand put some of the anti squeal brake goo on the contact parts.  I have a seperate bottle of this, although a little bit usually comes with car pads.  It didn't come with these, and I don't even know if its useful on motorcycles, but it couldn't hurt.  I put the outside pad in the holder and install the clip, and amazingly enough, its as if it was designed that way!  One note on the pads.  They come with a new screw, as the inside pad screws to a holding plate, and the stock screw is too small.  But it comes with a lock washer, the kind thats split and forged so it puts pressure on the two pieces, etc.  But the washer is too big, and you can't actually get the thing back together if you use it.  So I just skipped using it.  I checked it after a ride and it still feels secure.  Someone remind me to check it again after a while...

Now, when changing brake pads, you have to push the cylinder back into the caliper, which pushes brake fluid back into the resrvoir.  So the manual recommends you take some of the brake fluid out so it doesn't spill over.  This is where I have a few problems.  First, you want to get the reservoir level-ish, or it'll dump out when you unscrew it, kinda like what happened with the primary case.  But this bike has non-stock handlebars (more on that in another post), and when you don't have a lift or something else to make the bike level, you want to turn the wheel all the way to the right so you have good access to the caliper, otherwise you end up with a tiny workspace, which is no fun.  BIkes are cramped enough.

I didn't really have a choice, and the reservoir wasn't too off level when the bars were cranked to the right, so I got some sturdy shop towels underneath the resrvoir, ready to clean up anything that spilled.  Luckily it wasn't that high, probably partly because the pads were so worn, and the caliper was so far out.  So I used a metal spoon and took out some and safely stored it in a very clean glass jar. 

As the manual recommends, don't take out enough that air can get into the system.  I've never bled brakes, and I don't really want to (although I'm going to have to), but I helped my dad do it once on his volvo when I was like 16, and it sucked.  Don't get air in the system.  So once you get your pads in place and ready to reassemble, you have to pump the brakes to get the caliper back in place.  I had pushed mine in farther than necessary, so it had a lot of travel, so I had to pull the lever like 50 times.  I left the cover off, which I'm not sure you're supposed to do, so I could watch for bubbles.  It didn't give bubbles, but a filmy cruddy goo came out as I did this.  This tells me, that I'm going to have to bleed these sooner or later. The pedal feels pretty firm, but brakes on a motorcycle are not something you want to take chances on.  I'll eventually be taking the front wheel off for replacement or painting, and then the fork sliders off for painting, so I'll probably do it then.

Because of the shenanigans so far, and those worn pads, I wanted to check the rear pads, but ran into another tool problem.  The rear caliper uses these giant star bit bolts.  So I'll have to take another trip to Harbor Freight to buy the set that has the bigger size mounted for 1/2" socket wrenches.  ANd look at that rusty bleeder screw...

Wow, did I say these posts seemed long?  Just goes to show how much actually goes into these little jobs that only take 4 or 5 steps in the manual...

Previous Owner Shenanigans and General Repair, Part 4

Part 4, adjusting the clutch

When I got the bike, and so far since, when I first start it up and put it into first gear, it grinds just a bit.  Now I've heard this happen on other Harleys I've observed since, even brand new ones, but it is not a healthy sound.  Its fine after its driven for even a moment though.  But I took it upon myself to try adjusting the clutch cable.  I did this for a few reasons.  I wanted to get inside and look at stuff, cuz its kinda fun.  Also, the primary chain case leaks at the shift shaft seal, so I wanted to check a few of the gaskets and parts to see what needed replacing.  Like the main primary cover gasket had little pieces hanging out, so I knew it would need replacing when I took it off (I also plan to paint it wrinkle black).

Nate told me they replaced the clutch cable, so the new cable is this really fat braided steel look.  It didn't have a boot to cover the adjuster, which I'm not a fan of parts like that left to the elements.  So I have to find a 4" long boot that is slightly wider than stock, which shouldnt be too hard, or I can buy the stock boot and try to finesse it on.  I'm not really worried about it now.

So, on to the procedure.  I followed the Clymer guys on this one.  Quick note, the Clymer manuals are ok, but since they have to keep giving different instruction on 3 or 4 different sets of model years for the span covered by the manual, I feel like they leave out important details.  It was $40, where the Harley service manual is $60.  The Harley manual covers just your year, so you only have to deal with procedures that differentiate on different Sportster models, which probably isn't nearly as much.  I wish I would have bought the Harley manual, but I am too cheap to justify buying $100 worth of service manuals that tell me roughly the same thing.

Again, on with the procedure.  I noticed right away that the hex bolts for the chain inspection hole cover looked like they had been sodomized.  I had to really jam the hex key in and pray that it wouldn't strip it completely.  Luckily it worked, and $1 per screw later, they're shiny & new.  Each screw has its own little o-ring, and the little cover itself has an o-ring.  They were in good shape.  Yay for good news!

On to the clutch cover.  The first thing the manual doesn't tell you, is that the foot peg has to come off to get access to one of the screws, unless maybe you have some special tool to get into the wierd space, but then the peg would really be in the way if you didn't take it off.  So the peg cam off at the mount.  Note, you don't have to take it off where the mount is mounted to the case, just the peg itself.
The second thing the manual doesn't tell you, is that these are torque bits, aka star bits.  Star bits aren't really common, and my little Craftsman toolset only went up to 25 I think, and these were bigger.  So a trip to Harbor Freight was in order.  Harbor Freight sells cheap tools.  I wouldn't buy certain things from them, but a set of star bits, N P.  Unfortunately, I discovered later that the set I bought didn't have one big enough for the giant star bit bolt on the rear caliper, which kinda ticks me off.

The third thing the manual doesn't tell you, but I had guessed: if you don't have a cool stand (which I did not yet have when I did this), and the bike is sitting on the left side, when you start undoing the bolts for the lutch cover, the primary oil is going to come out.  Backroads had told me they replaced the engine and primary oil, so this stuff was pretty clean.  Just smells like gear oil, which has a particular smell.  So I get a little rubbermaid disposable container,  make sure it's spotless, and let it slowly drain in until it stops (yes, I reused the oil that came out, because it was brand new, and I'll later be taking the whole primary case cover off and replacing the oil anyways).

Then I pull the cover off and gasp in horror.  The clutch cover has some special kind of gasket.  As I had been reading so far in the manual, and the parts place online, its called a quad ring, but its a big circle that fits between the cover and the primary case.  Why is it called a quad ring?  A normal circular gasket is either flat or tubular/round.  This gasket is square, ie 4 sides, which explains the quad ring name.  But why did I gasp in horror?  It looked like the PO, or whoever last put this on, had used a combination of bubblegum and liquid gasket.  This means it's going to take time to get all this crud off so the new one will work.  And sure enough, it took time, but it came off.  Maybe this was the original gasket, and it could have melted a bit, but they must have used liquid gasket in there somewhere, because there were 2 distinct colors of crud I was scraping off.

The next thing the manual doesn't tell you, is that if its on its side, it is no easy task to install the quad ring and clutch cover when you put it back on.  Like I said, it's square (which would give it a better sealing surface, so I get it now).  The primary case has a little groove that you put it in so it will sit there nicely while you put the clutch cover on.  The groove even has 4 little notches around the edge to help it stay in place.  BUT WHEN THE BIKE IS ON ITS SIDE, GRAVITY DOESN'T CARE!  It just wants to fall out.  Maybe this is why the last person used liquid gasket, to kind of glue it in place while they put it on.  So it took a great deal of tom-foolery to get the thing to stay in place long enough to get the clutch cover on. The first time I started tightening, I was worried it had come out, and if it isn't in the little groove, its going to leak. Took it off and saw it was still in there, and put the clutch cover on.  Put the oil back in through the chain inspection cover.

Problem solved.  And no, it doesn't leak out of the clutch cover.  It barely leaks out of the shift shaft seal, but I'm still going to deal with it.  And this bit of PO work worries me about what else I'll find.  The best part is, I get to do this all over again when I take the primary cover off to deal with the other gaskets & seals, and paint the cover!

These posts are longer than I expected, but whatevz