1st things first, if you look at this job and think you want to do it, make sure you get the right trim ring. Their all about the same price, this was $15 I think, but sportster customs all have a different headlight bucket, so it takes a different trim ring. You'll know its the custom one by the little tab at the bottom with the hole for the mounting screw. You can see it in this awesomely-not-in-focus picture:
You can see the stock ring next to it. Its quite a bit more shallow, I was a little surprised. But the chrome is good quality, all in all it seems fine. I see these things for a lot more than $20 at some places. Also in this pic, you see the thick foamy seal thing. I figured it had a purpose, more on that later.
As for the procedure, why do I title this post rocket surgery? Because wow, this is so complicated.
Step 1: Take the screw off, it sits in the little tab, holds the trim ring to the bucket. It won't exactly fall off once you unscrew it, but be careful.
Step 2: Removing the trim ring. Since it only has one screw at the bottom, of course it holds to the top somehow. At 10 & 2 oclock when you're looking at it, there are little notchy things on the headlight bucket that hold the ring on at the top. It comes off pretty easily, JUST MAKE SURE YOU ARE READY TO DEAL WITH THE ACTUAL LIGHT ASSEMBLY! Because it WILL just fall out. Its held in by the wires attached to the headlight, and I doubt it would come undone completely unless it wasn't put together right, but it will fall and take a good swing at your forks or fender, and maybe crack the glass.
Step 3: Step four, get your new ring ready, put the screw on your screwdriver, because this takes 2 hands. The third step is simply putting the new trim ring in place. Like step 2, you have to deal with the headlight unit carefully. In this picture, you see the little ring that basically mounts the assembly to the bucket, and then the trim ring holds that mounting ring against the bucket once its installed. Here's the ring on the assembly:
This ring fits on the headlight one way. Theres a little notch in the ring down at about 4 oclock looking at the headlight head on. Make sure its in the right place. I can see marks of the PO trying to do it wrong...
Then it fits on the bucket with little notches right around the mounting ears. Its hard to describe, but again, it only fits one way. Here it is mounted:
Someone tell me why this blog randomly rotates my pictures... So this shows how the mounting ring aligns on the headlight bucket, and it also shows the little ears that hold the trim ring on at the top.
So you hold the headlight in place, and stick the trim ring on. This is where the rocket surgery comes into play. There is very little clearence to get this on, which at least tells me its made right. The first impediment is the foam seal on the trim ring. The stock ring fits right up against the light, so this new style naturally needs a way to keep pressure on the light. But it makes it really obnoxious to put on. Resistance. So get it place straight on, and make sure the foam part is all the way around the outer edge. then push it on and get it over the ears on the top. Then the little glass bump thing at the bottom of the light gets in the way as you try to finish. So after a few moments of fidgeting, I got the ring on, and then screwed it in place.
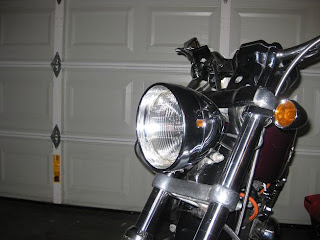
The result is relatively dramatic, and I like it. Eventually, I'll be painting the bucket black, and leaving the ring chrome, so it'll be a neat 2 tone thing, but now I may end up painting the ring black too. I dunno. So here it is:
BTW, I was wiping off the fingerprints & stuff, and noticed a huge nasty scuff on the left side of the bucket... How on earth did the PO manage that...


No comments:
Post a Comment